
Leg day leaves a specific kind of damage. Squats, Romanian deadlifts, leg press until your quads beg you to stop. By the next morning your thighs feel like you stuffed them with wet sand. Walking down stairs becomes a negotiation. If you have been dealing with that soreness and doing nothing about it except waiting it out, an epsom salt bath is one of the simplest, lowest-cost tools you can add to your recovery routine.
I have been recommending post-workout soaks to clients for years, and the most common mistake I see is people just tossing some salt in a lukewarm tub and calling it good. Getting the most from an epsom salt bath takes about two minutes of setup and a few decisions made right. This guide walks you through exactly what to do, from the moment you finish training to the moment you step out of the tub. The recommended product I use personally and with clients is Dr Teal's Epsom Salt Soaking Solution in the lavender formula. It is reliable, easy to find, and priced so you can actually use it consistently without guilt.
Your legs are already sore. Stop waiting for it to pass on its own.
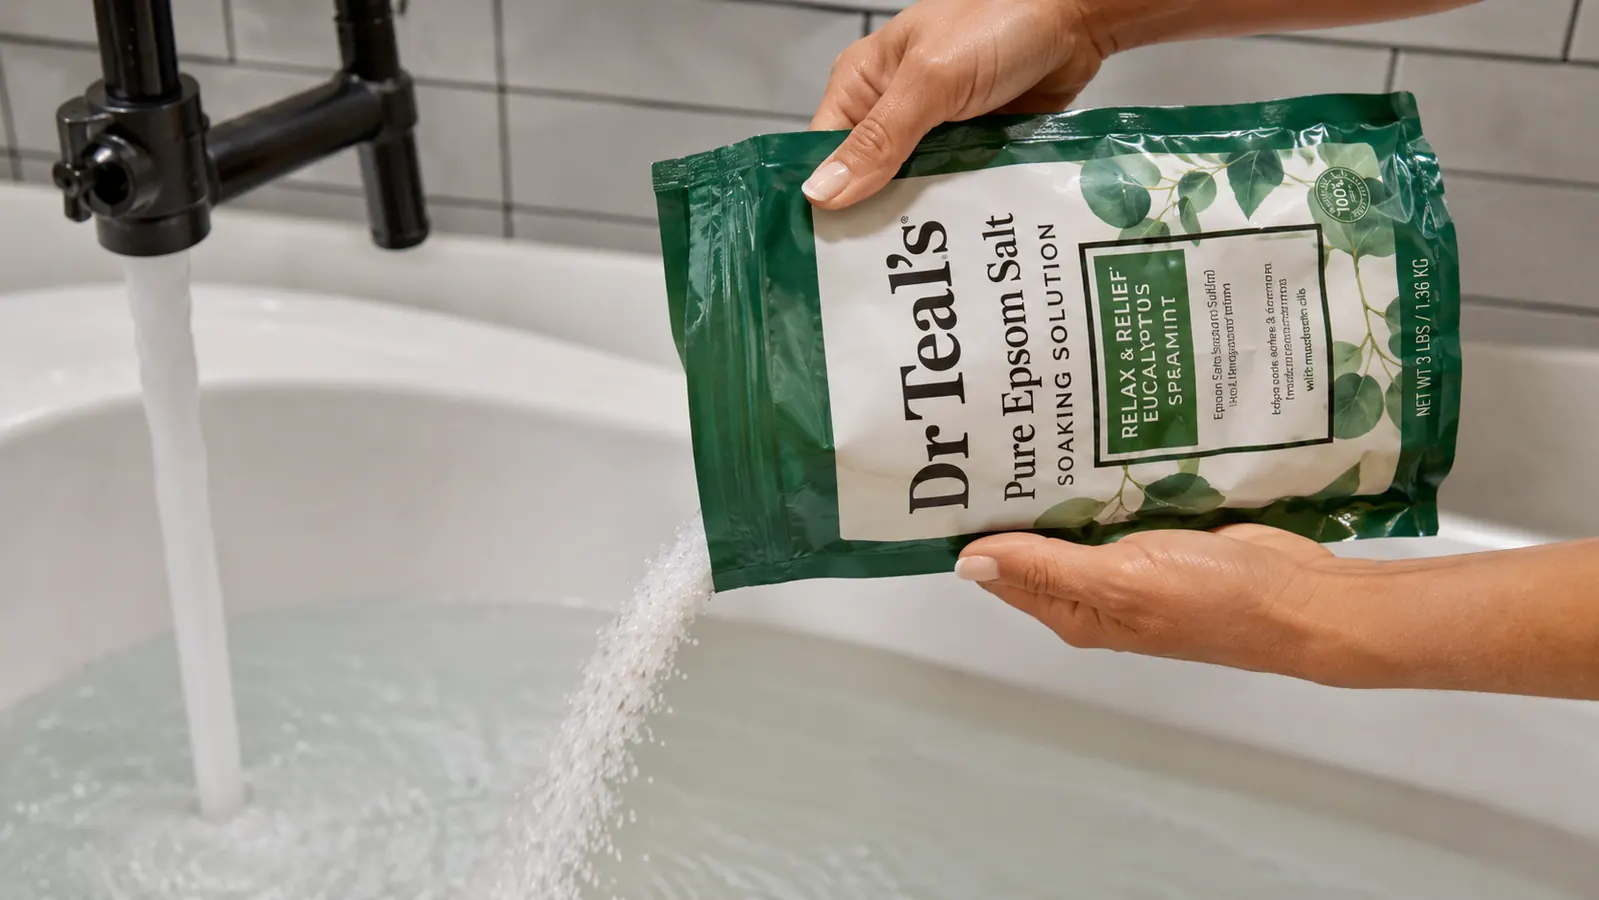
Dr Teal's Epsom Salt Soaking Solution is what Coach Dana keeps in her bathroom year-round. Three pounds per bag, lavender scent, and a price point that makes it easy to use after every hard session.
Amazon Check Today's Price on Amazon →Step 1: Wait at Least 30 Minutes After Your Workout Before Getting In
This one surprises people. Jumping straight from the gym into a hot bath sounds logical but your core body temperature is still elevated after intense training, and a very hot bath on top of that can leave you lightheaded. Give yourself at least 30 minutes. Use that window to change clothes, drink 16 to 20 ounces of water, and have a small protein snack if you need one. A whey shake or some Greek yogurt works fine.
The waiting period also lets your heart rate return toward baseline. An epsom salt soak is meant to be a parasympathetic, rest-and-repair experience. Starting it while you are still wired from the workout undercuts that. Think of the bath as the final transition out of training mode.
Step 2: Fill the Tub to the Right Temperature
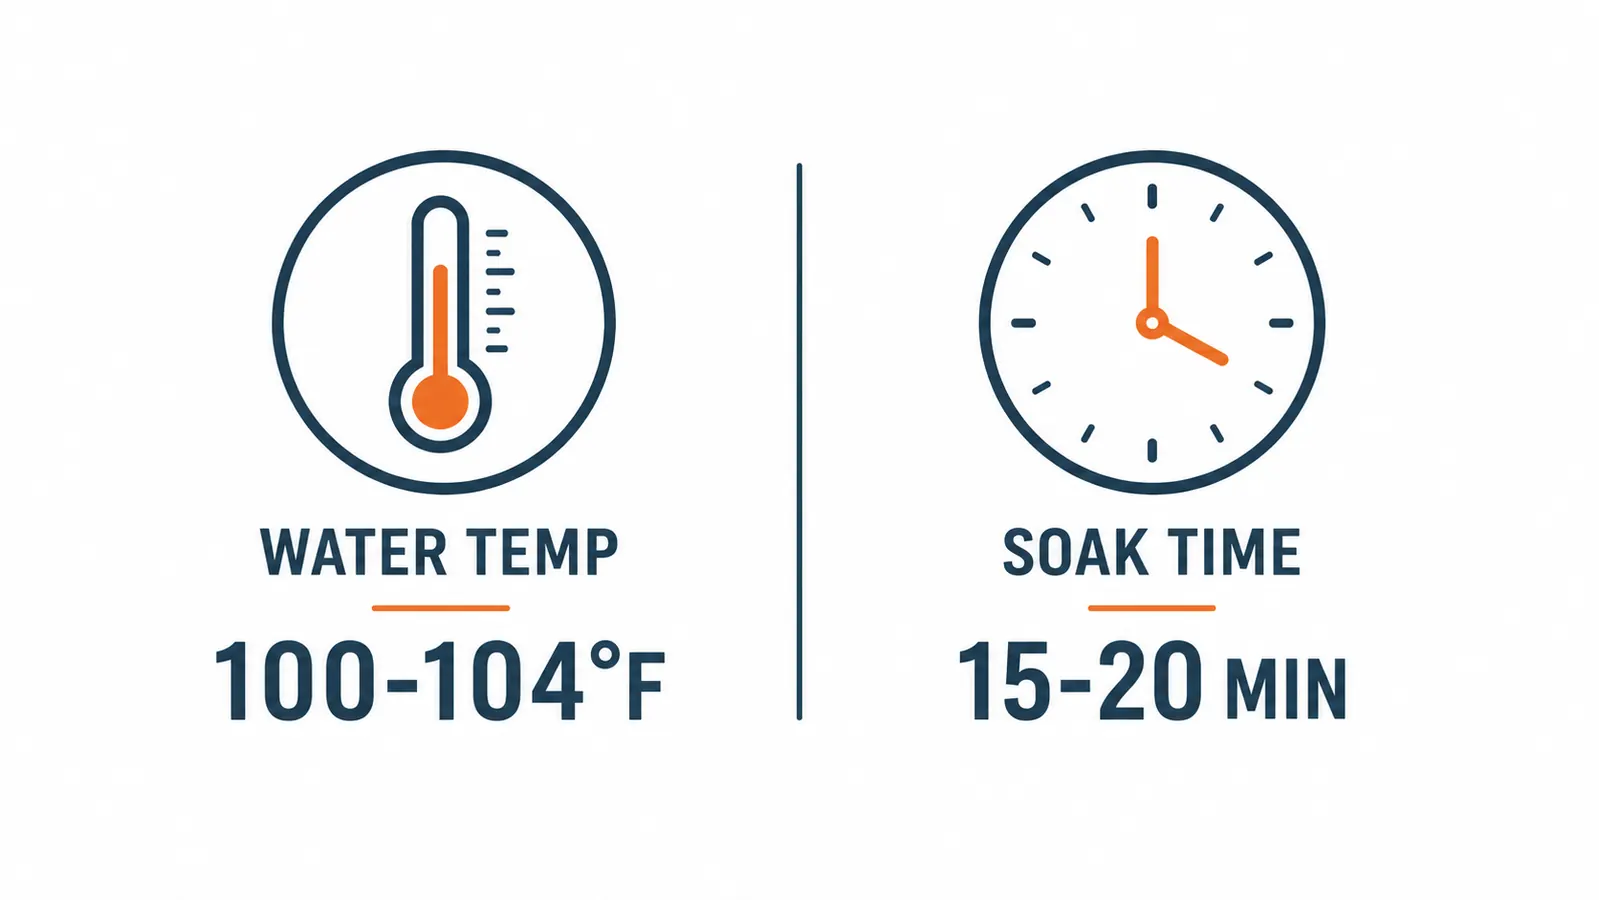
Water temperature matters more than most people realize. You want warm to comfortably hot, somewhere between 100 and 104 degrees Fahrenheit. Below that, you are not getting much circulation benefit. Above that, you risk staying in too long because it feels soothing, only to feel drained when you get out. A simple meat thermometer or a bath thermometer works fine. After a few times you will know by feel.
Avoid ice-cold baths unless you are specifically doing contrast therapy and know what you are doing. For most gym-goers recovering from hypertrophy-focused leg training, warm water is the better call. Cold immersion after strength training may blunt some of the muscle adaptation signal you worked hard to create. Save the cold for race recovery, not your typical squat session.
Step 3: Measure Your Epsom Salt and Add It Early
For a standard-size bathtub, use two cups of epsom salt. If you have a larger soaking tub, go up to three cups. Add the salt while the water is still running so it has time to fully dissolve before you get in. Undissolved crystals sitting at the bottom of the tub do not do much. Dr Teal's dissolves cleanly, and the lavender scent releases as the warm water heats up, which has its own effect on the nervous system.
I keep a dry measuring cup right next to the Dr Teal's bag on my bathroom shelf so the habit is frictionless. No fumbling around looking for something to scoop with when all I want to do is soak. Small setup decisions like that are what actually make a recovery habit stick over time.
Two cups, 102 degrees, 18 minutes. That is the formula I land on after most leg sessions. Simple enough to remember, effective enough to notice the difference the next morning.
Step 4: Soak for 15 to 20 Minutes
Set a timer. Fifteen minutes is the floor for getting real benefit from the warmth and the mineral exposure. Twenty minutes is the ceiling before most people start to feel waterlogged or their skin prunes enough to get annoying. Staying in longer than 20 minutes does not meaningfully increase recovery benefit and can leave you feeling overly relaxed to the point of fatigue, which is not what you want if you have anything else to do with your evening.
While you soak, keep a glass of water within reach. Sweating in a warm bath is real, and you want to stay ahead of any mild dehydration. Drink about eight ounces during the soak. This is also a good time to do some light neck rolls and upper body stretches while the warmth is helping your muscles relax. Nothing aggressive, just gentle range-of-motion work.
Step 5: Cool Down and Rinse Before Bed
When the timer goes off, drain the tub and finish with a cool rinse, not cold, just cooler than the bath water. This helps bring your skin temperature down so you do not feel overheated when you try to sleep. The lavender in Dr Teal's formula does linger a bit, which is pleasant, but a brief rinse keeps your skin from feeling tacky.
After you dry off, apply lotion if your skin tends to get dry after soaking. The magnesium sulfate in epsom salt is not harmful to skin but it can leave some people feeling a little tight, especially in winter. A basic unscented body lotion takes care of it.
From here, your body is primed for sleep. The warmth raised your core temperature during the soak, and the subsequent cooldown mimics the temperature drop that naturally signals your brain it is time to rest. Most people who soak an hour or so before bed report falling asleep faster than usual. That sleep is where the actual muscle repair happens, so anything that improves sleep quality is part of your recovery stack.
What Else Helps on Top of the Epsom Salt Soak
An epsom salt bath works well as a standalone recovery tool, but it stacks nicely with a few other habits. Protein timing is one. Getting 30 to 40 grams of protein within two hours of your leg session sets up the repair process before you even get in the bath. Hydration is another. Soreness is always worse when you are even slightly dehydrated, so aim for half your bodyweight in ounces of water on hard training days.
If you want to add a manual component to your recovery, pairing the soak with some foam rolling or a massage ball on your glutes and hamstrings after you dry off can extend the benefit. The warmth from the bath temporarily increases tissue pliability, making that window a good time for soft tissue work. Keep it gentle since your muscles will already be fatigued.
For more on how often and why the soak helps, see the full breakdown in the article on 10 reasons an epsom salt bath helps sore muscles. If you are still deciding whether Dr Teal's is the right product, the long-form Dr Teal's Epsom Salt review covers eight weeks of consistent use with specifics on scent strength, dissolve time, and whether the branded version is worth it over generic store-bought epsom salt.
One thing I want to be clear about: an epsom salt bath is a wellness support tool, not a medical treatment. If you have significant joint pain, nerve symptoms, a skin condition, or any other health concern, please check with your doctor before adding this to your routine. What I am sharing here is general recovery guidance, not medical advice.
Ready to make this a weekly habit? Dr Teal's makes it easy to start tonight.
Three pounds of lavender epsom salt, a consistent dissolve, and a price that makes it realistic to soak after every tough session. Grab a bag and run through this protocol after your next leg day.
Amazon Check Today's Price on Amazon →